Translate your Webflow website
In this guide you can learn how to make your Webflow site multilingual - quickly and without a single line of code.
Save 15% using code - FLOWB15
Making your Webflow website multilingual is often considered complicated for many users of the platform. Webflow doesn’t offer a native solution for translating the whole of your site, so often users duplicate existing pages and replace the content with the translated language.
Unfortunately, this method is not good for SEO as the pages will either be poorly indexed or not indexed at all as search engines will flag this as duplicate content. Not to mention the fact it is hugely time consuming to manage multiple websites!
Luckily there’s a quick and simple solution for Webflow users. Weglot translates and displays the content of your website and gives you an intuitive interface to manage and edit your translations. Did we mention there’s no code or manual work needed?
We have partnered with Weglot to provide the best solution for this often challenging aspect. Flowbase users can also save 15% off the fees, using our code FLOWB15
Let’s take a look at just how easy this solution is to install.
1 - Create an account on Weglot
This is where you’ll manage your translations. Sign up here.

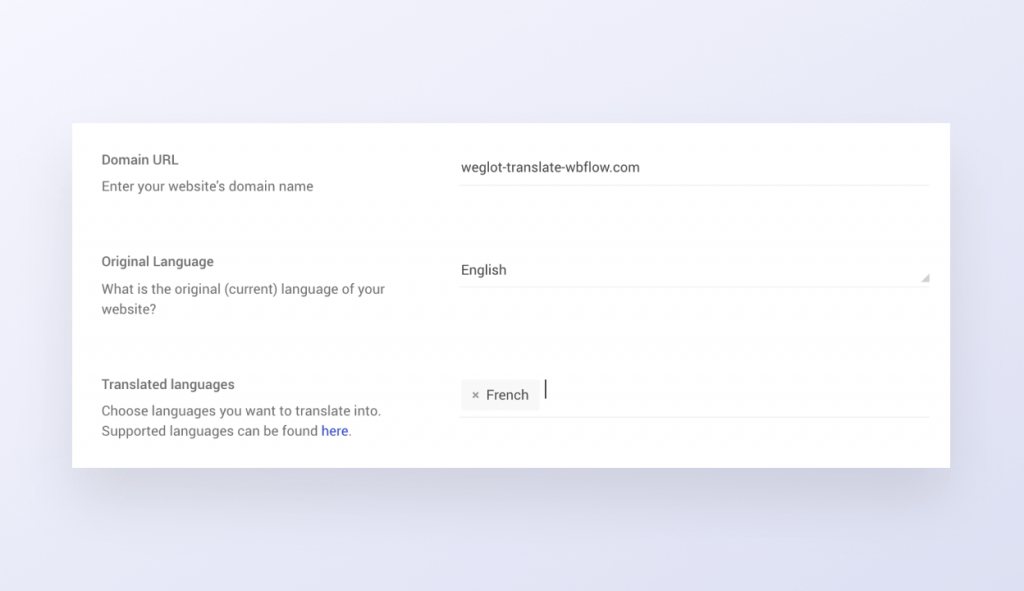
2 - Enter your domain name and languages
Here you need to enter your domain name and the languages you want to appear on your site. Important: DO NOT add your temporary domain name ending with .webflow.io.
In this example:
- the domain is .weglot-translate-wbflow.com
- the original language is English
- the translated language is French
Click on the “Next” button to go to the following step.
3 - Configure the subdomains in the DNS records
Here you’ll need to configure your DNS to create and connect the subdomains.
The subdomains will display the translations of your Webflow website once configured. In this example, we’ve used Google Domains as our domain name provider; however, the DNS entry process will look pretty similar no matter which you’ve chosen to use.
On your Weglot account setup, you’ll see the following DNS entries to add:

Go to your domain name provider account. Then, go to the section or page where you can manage the DNS (e.g. in Google Domains, it’s located under a tab on the left-side menu bar called DNS).
You should now be able to create new entries in the DNS table on your screen (in our example it’s in the section “Custom resource records”). Select CNAME as the type of entry.
Enter the first part of the certificate under the Name section and the last part under the Data section.
(Note: if you’re using Google Domains, add a “.” at the end of the certificate ending with “.acm-validations.aws”, so that it reads ”xxxx.acm-validations.aws.”)

If you have a problem finding or updating your DNS records, you can contact Weglot: support@weglot.com.
Once you have added and saved the entries, go back to the Weglot page. You can click on “Check DNS” and a green tick should appear: this means everything has been successfully set up. Now, just click on “Next”.
4 - Install the Weglot library
This is the final step of the installation and where you’ll add the language switcher button to your Webflow website and customize some of the app settings.

- Go to your Webflow admin area, click on “Settings” > “Custom Code”
- Go to “Head Code”, and you should see a field that’s titled “Add code at the end of the <head> tag:”</head>
- Copy paste the JavaScript snippet provided to you on your Weglot account. It will look like the example below (but with your actual API key instead of the placeholder “YOUR_API_KEY”):

- Click “Save Changes”
- Publish your changes, clicking on the blue button at the very top right
5 - Your multilingual website is live
And, that’s all there is to it! Go to your website, and you’ll see the language switcher button at the very bottom right of your site. Give it a few minutes to make sure your subdomains are properly set up, then you can try changing the language, and you’ll see your translated pages.
If you want to add a native language switcher in your menu, you can create a dropdown and add links with the following format:
#Weglot-fr for French
#Weglot-en for English
Interested in seeing how Weglot works for yourself? Start your 10-day free trial.